
How to Taste Wine (Beginner-Friendly Step-by-Step Guide)
Wine tasting for beginners is simpler than it sounds. You don’t need to memorize flavors or use fancy terms to do it well.
The goal isn’t to impress anyone—it’s to understand what you’re experiencing and what you enjoy.
The basic process looks like this:
Look at the wine
Swirl the glass
Smell the aromas
Sip and notice how it feels
Pay attention to the finish
That’s it. If you can do those five things with a little attention, you’re already tasting wine the right way. Let’s walk through what each step actually means.
Trying to figure out what wines you actually like? Somm Scribe helps you save tasting notes, track patterns, and remember bottles worth buying again.
The 5 Steps of Wine Tasting
1. Look at the Wine (Color & Appearance)
Before you smell or sip, take a second to look at the wine. Tilt your glass against a neutral background and notice:
The color (light vs deep)
The clarity
The intensity
Lighter red wines often feel lighter on the palate. Deeper, darker wines tend to feel fuller and richer. With white wines, pale colors usually signal freshness, while deeper gold tones can suggest richness or age. You’re not analyzing, you’re just noticing.
2. Swirl the Glass (Release Aromas)
Swirling isn’t for show it helps the wine open up. If you’re new to it, keep the glass on the table and swirl gently in small circles. This introduces oxygen, which helps release aromas.
And aroma is where most of what we call “taste” actually comes from.
3. Smell the Wine (Aromas & Notes)
This is the most important step—and the one most beginners rush. Take one slow inhale, then a couple shorter sniffs.
You don’t need to find anything fancy. Start simple:
Does it smell like fruit? (cherry, blackberry, apple, lemon)
Is it floral, herbal, or earthy?
Do you notice spice, vanilla, or toast?
If you can identify two or three things, you’re doing it right.
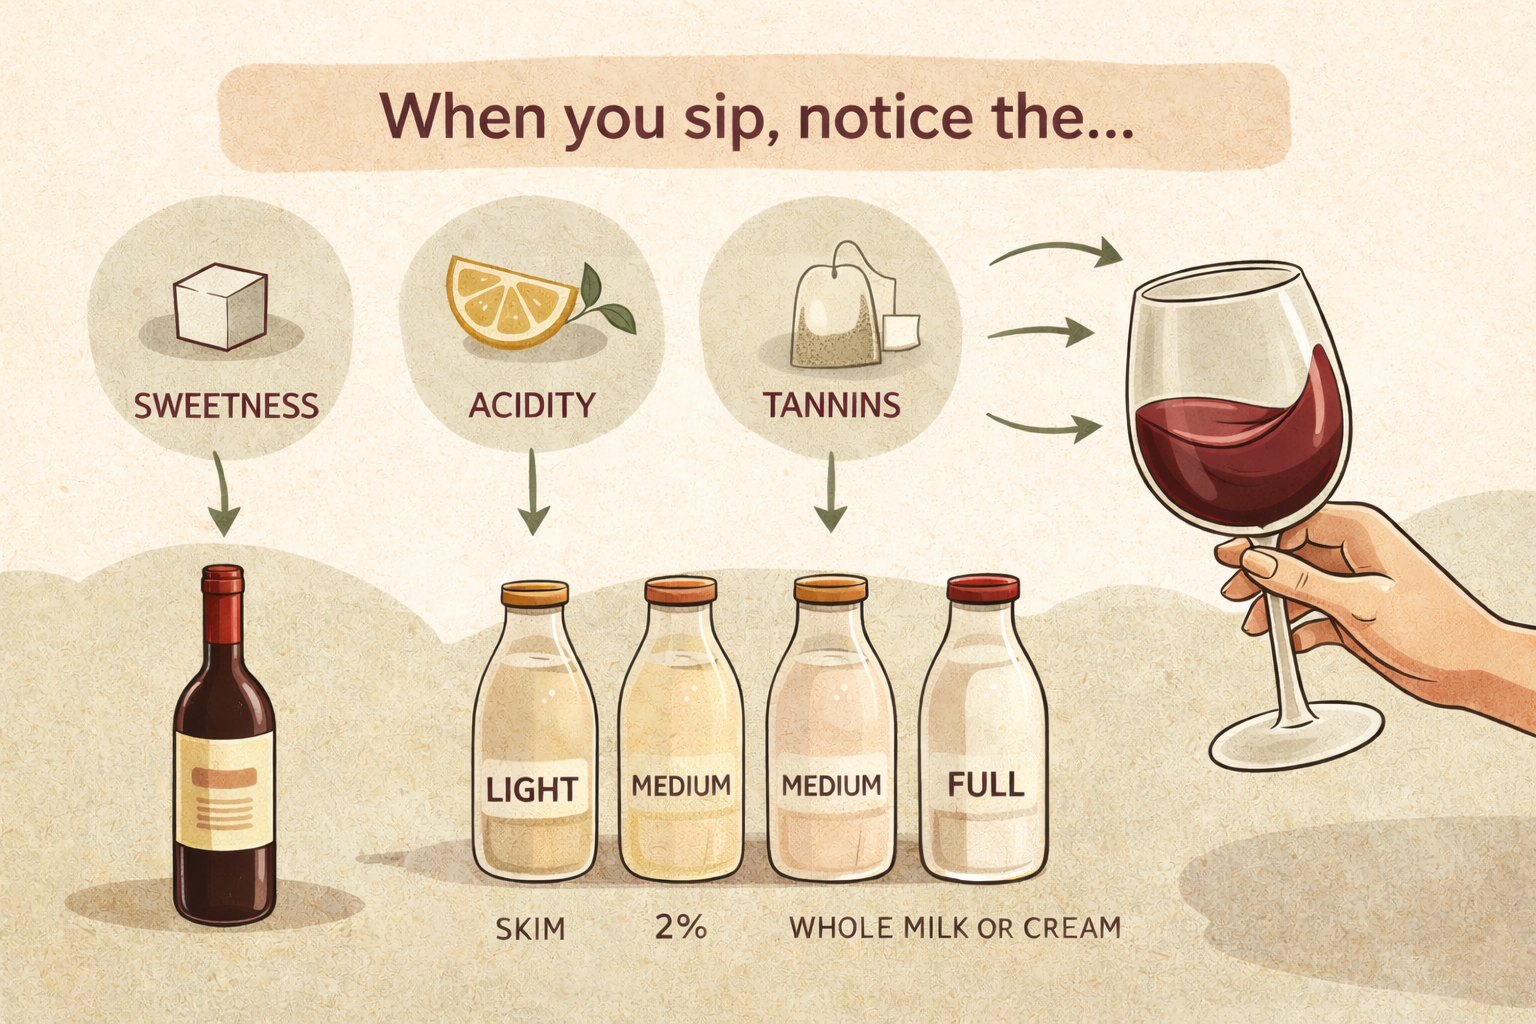
4. Sip the Wine (Taste & Structure)
Take a sip and let the wine move across your tongue before swallowing. This is where you notice how the wine feels, not just how it tastes.
Pay attention to:
Sweetness – Most wines are dry, but some have a hint of sweetness
Acidity – Does your mouth water?
Tannin (in red wine) – Do your gums feel dry?
Body – Does it feel light like water or fuller like cream?
This is called wine structure—and it matters more than memorizing flavor notes.
5. Notice the Finish (Aftertaste)
After you swallow, pause.
Does the flavor disappear quickly?
Or does it linger for several seconds?
This “finish” tells you a lot about the wine’s quality and balance. It’s also the step most people skip—but it’s often where wines start to separate themselves.
What Does Wine Taste Like for Beginners?
If you’re new to wine, everything can feel vague at first. That’s normal.
You don’t need to describe “graphite” or “crushed violets.” Simple words are more useful:
Fresh
Smooth
Dry
Bright
Rich
Light
A beginner tasting note might look like this:
Medium ruby color
Smells like cherry with a hint of vanilla
Tastes fresh, medium-bodied, with soft tannins
Smooth, easy finish
That’s real wine tasting. Clear and honest.
The best way to get better at tasting wine is to write down what you notice. Somm Scribe gives you a simple place to save each bottle and compare your notes later.
Common Beginner Mistakes When Tasting Wine
Most people don’t struggle because they lack ability—they struggle because they rush. A few things to avoid:
Skipping the smelling step
Focusing only on flavor instead of structure
Trying to identify too many aromas
Not pausing between steps
Not writing anything down
Wine tasting improves quickly when you slow down and repeat the process.
How to Get Better at Wine Tasting
You don’t need talent you need repetition. The fastest way to improve is:
Taste intentionally (not passively)
Compare wines side by side
Pay attention to structure (not just flavor)
Keep your descriptions simple
And most importantly: Write your tastings down
Why Writing Your Tastings Down Changes Everything
This is where things start to click. When you log even a few words about what you tasted:
Patterns start to emerge
You recognize what you like
Your confidence builds quickly
You stop guessing and start understanding. That’s why sommeliers keep notebooks. And it’s exactly why Somm Scribe exists. It gives you a simple way to capture what you notice without overthinking it.
FAQ: How to Taste Wine
How do beginners taste wine?
By following a simple five-step approach: look, swirl, smell, sip, and savor. Focus on noticing, not performing.
Do I need to know fancy wine terms?
No. Simple, everyday language is more than enough.
How long does it take to get better at tasting wine?
Most people notice improvement after just a few intentional tastings.
Ready to Start Tasting with Confidence?
If you want a simple way to track aromas, flavors, structure, and your personal preferences without overthinking it, Somm Scribe gives you a clean, guided format that takes less than 30 seconds to use.
The best way to get better at tasting wine is to write down what you notice. Somm Scribe gives you a simple place to save each bottle and compare your notes later.